Why do Roof Skylights leak?
Roof skylights can be a wonderful addition to a home, but can come with inherent liability and problems.
(Two things are important)
(1) The quality and design of the unit itself.
(2) Roof insulation.
Roof skylights installed will live in a very harsh environment, UV, heavy rain, organic debris, snow and roof design are all factors that will impact the performance and the life of a skylight unit. Here are some things you should look for when installing, replacing or repairing a skylight unit.
Quality of a Roof Skylights Unit
- 1st – We recommend using an insulated glass for the glazing of your unit. Acrylic glazing (plastic dome) will tend to “crack” or “craze” over time, shortening the life of your unit as well as creating a leak liability.
[ Low E glass options have much better insulating “R value” properties over the acrylic dome units and can also be tinted and upgraded to provide better resistance from heat and light gain thru unit in summer months. We have found that the life expectancy and warranties are better than double with glass against acrylic.]
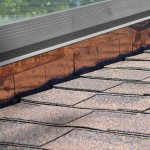
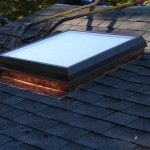
- 2nd – Most roof skylights that leak are usually caused by the installation and tie-in to the roof system. It is vitally important that the “factory flashing” system that is designed for your unit follows good flashing techniques for the type and pitch of roof that it is being installed in. For a pitched roof (3/12 or better) we recommend a unit that has a step flashing system that consists of a front apron flashing, side step and counter flashing as well as a rear cricket flashing. When assembled properly, this system should work perfectly for the entire life of your roof system without the need to be caulked or resealed during its life. We recommend that you stay away from one piece or flat flange systems in a pitched roof environment.
- 3rd – We also recommend that the installed unit has a hatch or glazing that can be easily and independently removed and replaced without disturbing the roof/base flashing system. This will allow you to repair or replace the hatch/glazing should it fail or be damaged without disturbing the roof, flashing or curb.
- 4th – Be sure that structural framing of the roof skylight opening thru your roof is done to code. Skylights wider than 30” usually require cutting two or more roof rafters to install. This transfers the weight that was carried by the cut rafters to the two outside rafters. If this is not framed to code it will likely cause movement (sag in deck) around the unit and this movement and settling of the deck can cause the skylight flashing and adjoining shingles to shift or move. This movement can be the direct cause of water intrusion as well as causing damage to interior finish.
Installation of the Roof Skylights:
Make sure the “curb” of the skylight unit is properly secured and insulated, more times than not we find units that were set into an opening and never shimmed and secured. This can allow movement of unit and flashings leading to water intrusion. Insulating the space between the rough opening and the wood curb is also important, as excessive heat loss during snow conditions can cause an Ice Dam at the bottom apron of the unit when melting water on the perimeter of the unit refreezes.
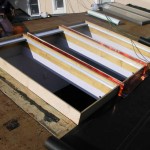
The assembly of the step flashing system is critical for proper waterproofing of the skylight. The apron, steps, and flashing should be set in a full, blind application of modified roof cement and assembled per the manufacturers specifications.
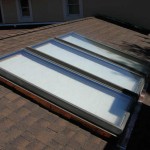
The hatch /glazing should be set on curb when flashing system is complete. It is important that the hatch is set square to the curb and the factory seals of the hatch seat tightly to the top of the curb to insure a proper seal from the intrusion of both water and air.
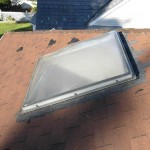
Skylights and Flat Roofs
In the case of a NY flat roofing installation, the unit design and the installation is different. A low-pitched roof (less than 3/12) would require some version of a flat roof material. The unit design of a flat roof skylight has the following differences. The curb height is generally 4” to 8” higher than a pitched roof unit and the base flashing is a flat, one-piece flange. We recommend using a 2”x 4” wood nailer on the perimeter of the rough opening to build up the flashing line 1½” above the roof deck. Installation of a 1½”x 12” tapered installation, picture framed and mitered on the perimeter of the rough opening will move water away from the unit.

The field of the roof system should be brought up to the edge of the rough opening and a 4” application of tar or water block (depending on applied system) should be installed. The unit can then be set into the opening and the one-piece flash should be compression fastened into the applied sealant. The flashing should have a 6” cover flashing installed to create an “envelope” seal of the skylight flashing, this detail will, when done correctly, insure that the skylight unit will perform in all weather conditions for the entire life of the installed roof system. As for the glazing assembly, the same recommendations made for a pitched roof skylight would apply.