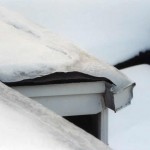
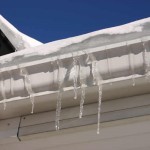
Ice damming itself cannot be prevented but there are steps you can take to protect your home from its effects.


When you design a roof assembly it is always smart to consider the typical ice dam danger spots in the roof structure as well as trying to know the history of performance in the ice damming conditions. Ice Dam protection is very important in the north/eastern region of the United States
The “NRCA”, National Roof Contractors Association, tells us that in the north/east region there are specific procedures to follow for recommended protection from ice damming. There are also additional procedures we have implemented as a result of responding and repairing ice dam leaks over the last 20 plus years.
Bithane
The main product used to protect the structure with ice dam protection from leaks is Ice and Water Shield, which is a 36” wide roll of bithane, self adhered membrane that when applied to the roof deck will provide a water proof barrier between the roof shingles and the plywood substrate. The ice water shield has a “memory” and will seal around nails used to secure the roof shingles thus creating a waterproof underlayment. Felt paper and other under layment products do not provide this Ice Dam protection.
Ice and Water Shields
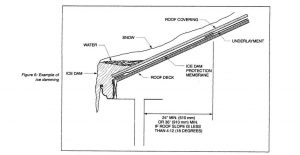
The use of a ice and water shield must be used in coordination with an edge metal at the gutter edges in order to insure the gap between the eave fascia and roof sheathing is closed and sealed. An ice and water membrane is brought over the fascia 2” and a 3”x 4” aluminum or copper edge metal is installed. An additional 6” layer of Ice water shield is then installed over metal to create an envelope (see diagram). If a gutter is used it should be installed “on top” of the edge metal. To insure water that may back up and overflow from the gutter cannot migrate behind the fascia.
The recommended installation of an Ice & water shield is to extend the coverage of the membrane (24”) beyond the “warm wall” of the building (see diagram). Structures with 12” or larger soffit overhangs will require two (2) 3” courses of ice & water shield. This is to extend the protected roof area thru the warm wall of the house.
Penetration of Ice and Water
Penetrations in the ice damming danger zones must be handled differently than ones in the other portions of the roof. Skylights, chimneys, plumbing vent pipes or other items that penetrate the roof in an ice-damming zone must be re-rated as a “flat roof” penetration. This must happens prior to the installation of the roof shingles. The ice & water shield may prevent water from seeping thru the deck but cannot stop water from falling into a hole. A hole made by a penetration unless it is “married” and flashed to the membrane. We will generally flash the penetration directly to the ice & water shield with tar and metal very similar to the way we would on a flat roofing system.
When the shingle system is installed we then provide a 2nd flashing that is tied into the shingles in a traditional “pitched roof” system. You have to flash penetrations in the area with the intent to perform under normal rain conditions. Also under ice damming conditions as well, this helps in your ice dam protection too.
Waterproof Membranes
Waterproof membranes are also specified for valleys, roof edges, wall tie-ins and low pitch roofs. It is recommended if the use of ice and water shield is made in an up slope portion of a pitch roof area. It should be installed continuously to the lower areas. You cannot expect water that has seeped below roof shingles on a higher portion of the roof to travel thru an area only protected by felt type underlayment’s to not reach the wood substrates.
In extreme areas where standard preventatives have not worked or and existing structure that was not protected correctly when it was built. De-icing cable systems can be installed to prevent the formation of ice dams if necessary.
Ice Damming
Ice damming is the result of multiple conditions and factors happening after a snow event. Shingle roofs are designed to work with pitch and overlap. Shingles and flashings are layered from bottom to top and the angle of the roof uses gravity to “shed” water down and off the roof surface. If the “shedding” of water is obstructed from moving down and off the field of the roof, water will pool and begin to “seep” thru the overlapped shingles and leaks to the interior of the structure will occur.
What are the typical conditions and factors for Ice Damming?
- Snow accumulation on shingle roof surface.
- Moderate pitch of roof surface 2”- 6” /on 12 (see how to determine pitch)
- North facing portion of roof.
- Small or no soffit overhang.
- Gutters
- Lack of proper venting.
- Poor insulation of heated space.
- Penetrations: i.e.: plumbing pipes, skylights, chimneys.
- Outside temperatures well below freezing in night time hours.
- Excessive heat loss from bathroom fan, pull down stair, high hat lighting.
- Rain or warm-up temperatures following snow and days of freezing.
Some or all of these conditions can cause the creation of an Ice Dam and water seepage.
Ice Damming Explained
To explain the process, after a fresh snowfall, the snow that is siting on your roof should melt off uniformly. This happens when temperature rise above freezing and from increased sun exposure. The snow should also freeze uniformly when temperatures drop below freezing and sun exposure is gone. The biggest factor that causes Ice damming is “irregular thaw” of snow on the roof from thermal loss. Mostly coming from the interior heated portion of the structure. The snow is not uniformly melting even though the exterior temperatures are below freezing.
Portions of the roof experiencing thermal loss will thaw snow and some portions will not. When thawed liquid begins to move downward with the pitch of the roof and reaches a portion of lower roof. A lower part not experiencing heat loss (usually the gutter edge) it refreezes. If you have ever seen an icicle form, it grows longer and longer as liquid water runs over it and refreezes.
The Ice Actually Grows
This same effect happens on the roof except this ice growth goes up as liquid and fed from thawing roof ice from above. It moves over the frozen lower sections and creates a continuous “speed bump” of ice that continues to grow higher and higher as it is fed water. This is how an Ice dam on a New York shingle roof is formed. It usually takes 24 – 48 hours from the time of the snowfall to form. Once formed any water from additional thaw or rain is now obscured at the high side of the ice dam and will begin to seep under the shingle assembly.
Although Ice damming most typically occurs at the gutters edges and valleys. We have seen it occur in almost any portion of the roof under the right conditions.
Preventing or protecting your home and roof from Ice damming conditions can be done.
If you have any further questions, don’t hesitate to contact your New York Residential Roofing online or give a call at 1 (800) 766-3776.


